
Important Reminder: Protecting Patient Information in Images Used in Accredited CME/CE
Accredited providers are obligated to protect patient confidentiality within continuing medical education (CME). Recently, the ACCME has been made aware of an issue where patient identifying information is retained in images that were cropped for use in teaching. Accredited providers should be aware that confidential patient information that is cropped out of images in PDF or PowerPoint files may still remain part of the file. Even though cropped information and portions of images are hidden from view, they may still be visible online, including on search engines. Below are instructions that you can share with your faculty to help to ensure that images in CME presentations are compliant with the Health Insurance Portability and Accountability Act (HIPAA).
Problem: After you crop an image within PowerPoint or any other Microsoft Office product, the cropped areas remain part of the file, hidden from view. To help prevent other people from viewing the parts of the image and information that you have removed, you need to take additional steps.
Solution: There are two ways to avoid retaining the sensitive portion of a cropped image within PowerPoint or any other Microsoft Office product and within PDFs that are created from Microsoft Office files:
- Use a different program: Crop and save the image outside of PowerPoint or other Microsoft Office product, and only insert the image into the presentation after you have saved the cropped image via another program. You can use a program such as Paint or Gimp. Paint is free and part of the default Microsoft Windows installation. Gimp is a free open source image manipulation program that is available for Windows or MAC.
OR
- Use the compress function: Crop the image within PowerPoint or other Microsoft Office product. Then, compress the image, being careful to select the “Delete cropped areas of pictures” check box to ensure that the sensitive content can no longer be accessed. More details are shown below:
- Select the picture or pictures from which you want to delete cropped areas.
- Click Picture Tools > Format, and in the Adjust group, click Compress Pictures. A dialog box appears showing compression options.
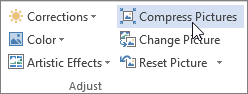
If you don't see the Picture Tools and Format tabs, make sure that you've selected a picture. You might have to double-click the picture to select it and open the Format tab. Also, if your screen size is reduced, you might only see the Compress Pictures icon.
Source: Crop a picture in Office—Microsoft Office support page
Questions? We’re happy to help. Please contact us at info@accme.org.